HOWTO move the FDC Flatness Scanner to a specific position
From GlueXWiki
To move the laser measurement device to a specific location, do the following:
Contents
Moving the laser the easy way
- Make sure the computer is on as well as the driver box and the VME crate (you will need to wait for two minutes after first turning on the VME crate to allow it time to boot up).
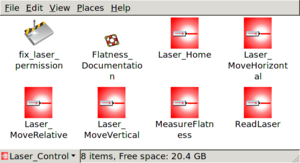
- Check that there is nothing obstructing the path of the laser. On the desktop, there is a folder called Laser_Control, double click on it. Alternatively, you can click on Applications→Laser_Control. There are several utilities here that allow you to move the laser in various ways.
- Laser_Home – Moves the laser to the lower-left corner of the rock (motion stops when both limit switches in that corner are compressed).
- Laser_MoveRelative – Moves the laser x inches right, and y inches up from its current position (negative values will cause left/upward motion).
- Laser_MoveVertical – Moves the laser from the bottom limit switch to the top one or vice-versa. Upon starting this utility, either the top or the bottom limit switch must be compressed or the move will fail.
- Laser_MoveHorizontal – Moves the laser from the left limit switch to the right one or vice-versa. Upon starting this utility, either the left or the right limit switch must be compressed or the move will fail.
- To begin a move, double click on the utility you have chosen, and when prompted choose Run in Terminal. (You will not receive this prompt if you select a utility from the applications menu.) Unless you have chosen Laser_MoveRelative, the laser should begin moving at this time.
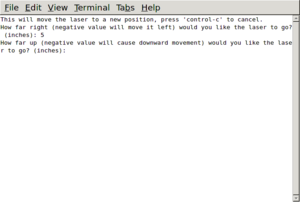
- If you have chosen Laser_MoveRelative you will need to follow the instructions to input how far the laser should move in the x and y directions. Then the laser should begin moving.
Moving the laser from the command line
- Make sure the computer is on as well as the driver box and the VME crate (you will need to wait for 2 minutes after first turning on the VME crate to allow it time to boot up).
- Log in to the VME crate using telnet. The VME crate allows only one telnet connection at a time so you'll need to kill any existing telnet process to ensure no other connection currently exists:
- killall -9 telnet
- telnet 192.168.1.2
- After entering these commands, the prompt should change from halldsc1> to halld-laser2>. This indicates that you are logged into the VME crate that controls the motors.
- Before moving the laser, please check that nothing is obstructing the path of the laser. Now you may start typing commands to move the laser. Several commands exist, the most relevant being:
- Laser_Home() – Moves the laser to the lower-left corner of the rock (motion stops when both limit switches in that corner are compressed).
- Laser_MoveRelative("x","y") – Moves the laser x inches left, and y inches down from its current position (negative values will cause right/upward motion).
- Laser_MoveVertical() – Moves the laser from the bottom limit switch to the top one or vice-versa. Upon entering this command, either the top or the bottom limit switch must be compressed or the move will fail.
- Laser_MoveHorizontal() – Moves the laser from the left limit switch to the right one or vice-versa. Upon entering this command, either the left or the right limit switch must be compressed or the move will fail.
- Type in a command (though replacing x and y with actual numbers) and hit return to start moving the laser right away.
Three things to note:
- The laser will stop motion in a given direction if it hits either of it's limit switches. It will continue any remaining motion in the orthogonal direction though.
- Negative values may be entered, be aware which directions are positive and which are negative (they are marked near the ends of the rails for the underlying control system which is opposite to the convention used in the software described here).
- The absolute position of the laser is reported in inches relative to the home position at the end of every call to Laser_MoveRelative("x","y").
NOTE: Because of limitations in how the VxWorks command prompt works, it is not possible to call the routine that moves the laser to an absolute position from the command prompt. You will need to simply do the math yourself to make the appropriate move with Laser_MoveRelative("x","y"), or in the worst case, issue a Laser_Home() command followed by a Laser_MoveRelative("x","y") command passing in the absolute coordinates as the arguments.
Troubleshooting
- If you make a mistake and wish to stop a currently executing motion, then you can do one of the following:
- Turn off power to the driver box to immediately stop motion in both directions.
- You can activate the limit switch by hand for no less than two seconds to stop motion in a given direction. If you do not hold the limit switch for long enough, the software will not register the change and will continue waiting for the move to complete.
- Turn off power to the VME crate. This should immediately stop motion in both directions. If you do this, the laser's position will be reported incorrectly until you issue a Laser_Home() command to recalibrate.
- If there are problems of any sort with either logging in to the VME crate or getting any response from the motors, try power cycling the driver and VME crate first. If there are still problems, try rebooting the Desktop computer.
Contact
Please refer any questions to David Lawrence davidl@jlab.org x5567


