Difference between revisions of "Semi-Automatic Field Mapping Logger"
From GlueXWiki
m (→Running the Field Logger Software) |
m (→Running the Field Logger Software) |
||
| Line 6: | Line 6: | ||
rdesktop halld2 -g 1800x1000 | rdesktop halld2 -g 1800x1000 | ||
2. Double click the shortcut '''Field_Logger''' on the desktop to run the LabVIEW application | 2. Double click the shortcut '''Field_Logger''' on the desktop to run the LabVIEW application | ||
| − | # Verify that all readings are updating. If some readings are missing, reboot related hardware (see system diagram) | + | # Verify that all readings are updating. If some readings are missing, exit the LabVIEW program and reboot related hardware (see system diagram) |
# Choose the type of file operation (default: open or create) | # Choose the type of file operation (default: open or create) | ||
# Open or Create a data file | # Open or Create a data file | ||
Revision as of 18:40, 19 June 2013
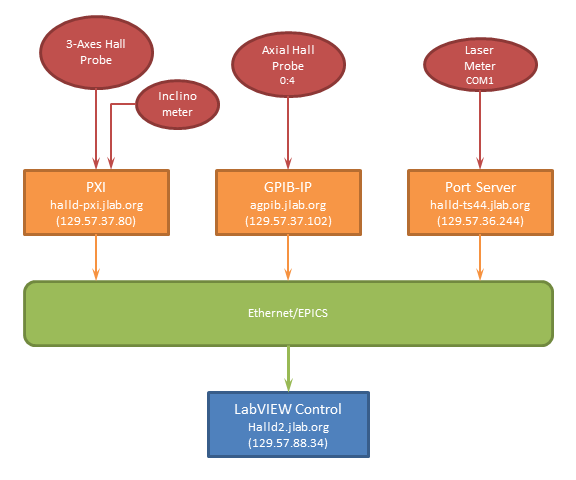
Field Mapping System Diagram
Running the Field Logger Software
1. Use remote desktop to log onto halld2 using account 'JLAB\halldusers', ask Elliott for password
rdesktop halld2 -g 1800x1000
2. Double click the shortcut Field_Logger on the desktop to run the LabVIEW application
- Verify that all readings are updating. If some readings are missing, exit the LabVIEW program and reboot related hardware (see system diagram)
- Choose the type of file operation (default: open or create)
- Open or Create a data file
- Type in the radius and phi angle of current probe position
- Load the appropriate Z preset file corresponding to current radius
- Use Previous and Next to choose the starting Z position if needed
- Move and turn the probes to desired Z position with a very small incline angle (both readings should be in green)
- Click Record to record current readings
- Continue to next point
Files
The files are stored on the halld-online group disk here:
/group/halld-online/Solenoid_Mapping
Which should also be accessible from the "M:" drive
M:\halld-online\Solenoid_Mapping
The file names are formatted to contain the date, start time, phi value, and radius. For example, the following file was:
- created on May 1st, 2013 at 11:39am
- the strut was positioned such that the tube positions were along φ=90o
- tube was at R=0 (i.e. along the center of the magnet).
Field_Data_20130501_1139_P90_R12.dat
The columns of a data file are: radius(inch), phi(deg), Z(cm), Incline(deg), B_x(Gauss), B_y(Gauss), B_z(Gauss) and B_axial(Gauss). And the X,Y,Z directions are defined as
- X: points to the beam left
- Y: points vertically up
- Z: points to the beam dump
