Difference between revisions of "Getting started with GlueX Software"
(Partially revised. Need to save changes so I can finish this later.) |
(Finished major modification) |
||
| Line 6: | Line 6: | ||
D. Lawrence 1/18/07 Finished Converting to Wiki <br> | D. Lawrence 1/18/07 Finished Converting to Wiki <br> | ||
D. Lawrence 2/4/08 Tweaked for calibDB among others <br> | D. Lawrence 2/4/08 Tweaked for calibDB among others <br> | ||
| − | D. Lawrence 2/ | + | D. Lawrence 2/17/09 Overhauled to reflect current state of code <br> |
=Overview= | =Overview= | ||
| Line 26: | Line 26: | ||
== Required 3rd Party Packages == | == Required 3rd Party Packages == | ||
The source relies on | The source relies on | ||
| − | several software packages that | + | several software packages that are not kept in the Hall-D |
| − | + | repository. These must be downloaded | |
| − | and installed prior to compiling the Hall-D source. | + | and installed prior to compiling the Hall-D source. Here is |
| − | + | a list of what you will need. | |
'''JANA''' | '''JANA''' | ||
* [http://www.jlab.org/JANA/downloads.php JANA downloads] | * [http://www.jlab.org/JANA/downloads.php JANA downloads] | ||
| − | Make sure you set your JANA_HOME environment variable. | + | Make sure you set your JANA_HOME environment variable |
| + | to point to the directory containing the ''bin'', ''lib'', and ''include'' | ||
| + | directories after building JANA. | ||
| − | |||
| − | |||
'''CERNLIB''' | '''CERNLIB''' | ||
| Line 44: | Line 44: | ||
Check [[CERNLIB_Installation | here]] for possible issues with CERNLIB installation. | Check [[CERNLIB_Installation | here]] for possible issues with CERNLIB installation. | ||
| + | |||
'''ROOT''' | '''ROOT''' | ||
| Line 76: | Line 77: | ||
== Getting the Hall-D Source == | == Getting the Hall-D Source == | ||
| − | The Hall-D specific source code is | + | The Hall-D specific source code is kept in a |
Subversion repository on the JLab CUE. The repository can be accessed via anonymous svn checkout | Subversion repository on the JLab CUE. The repository can be accessed via anonymous svn checkout | ||
(even from offsite) but you must have a CUE account and you must | (even from offsite) but you must have a CUE account and you must | ||
belong to the "halld" unix group in order to commit changes back into it. (Contact the JLab computer | belong to the "halld" unix group in order to commit changes back into it. (Contact the JLab computer | ||
| − | center for help | + | center for help on getting a CUE account.) |
First, you will need to create a directory where your files will | First, you will need to create a directory where your files will | ||
| Line 109: | Line 110: | ||
svn co https://halldsvn.jlab.org/repos/tags/release-2009-01-06 | svn co https://halldsvn.jlab.org/repos/tags/release-2009-01-06 | ||
| + | svn co https://halldsvn.jlab.org/repos/trunk/calib | ||
| + | where the second line obtains a copy of the calibration constants from the | ||
| + | repository where they are being kept temporarily until an actual database | ||
| + | is developed. | ||
Note that if you check out a tagged release, you should '''not''' commit any | Note that if you check out a tagged release, you should '''not''' commit any | ||
changes to that source back into the repository (in subversion, you can | changes to that source back into the repository (in subversion, you can | ||
| − | commit changes to tagged code | + | commit changes to tagged code just as easily as to the main trunk.) |
| − | If you want to develop code to contribute back into the repository, you | + | If you want to develop code to contribute back into the repository for |
| − | should checkout from the trunk of the tree: | + | others to use, you should checkout from the trunk of the tree: |
svn co https://halldsvn.jlab.org/repos/trunk/src | svn co https://halldsvn.jlab.org/repos/trunk/src | ||
| Line 122: | Line 127: | ||
===Setting up your Environment=== | ===Setting up your Environment=== | ||
Several environment variables are needed to compile and run the Hall-D software. | Several environment variables are needed to compile and run the Hall-D software. | ||
| + | The following is a list of environment variables related to 3rd party packages: | ||
| + | * JANA_HOME | ||
| + | * XERCESCROOT | ||
| + | * CERN | ||
| + | * CERN_LEVEL | ||
| + | * ROOTSYS | ||
| − | |||
| − | |||
| − | + | Environment variables needed that identify locations of Hall-D files | |
| − | + | ||
| − | + | * JANA_CALIB_URL | |
| − | + | * JANA_GEOMETRY_URL | |
| − | + | * HALLD_HOME | |
| − | + | * HALLD_MY ''(optional)'' | |
| − | + | ||
| − | + | ||
| − | + | ||
| − | + | ||
| − | + | ||
| − | + | ||
| − | + | ||
| − | + | ||
| − | + | Example: | |
| − | + | Suppose you checked out the code into a directory called /home/bob/GlueX. Then you would these environment variables to the following: | |
| + | |||
| + | |||
| + | setenv HALLD_HOME /home/Bob/GlueX | ||
| + | setenv JANA_CALIB_URL file:///home/Bob/GlueX/calib | ||
| + | setenv JANA_GEOMETRY_URL xmlfile://${HALLD_HOME}/src/programs/Simulation/hdds/main_HDDS.xml | ||
| − | + | If you wish to edit programs and then link against libraries in a common area you can do so through | |
| − | + | use of the [[Getting started with Hall-D Software on the JLab CUE|HALLD_MY]] environment variable | |
| + | whose use is explained [[Getting started with Hall-D Software on the JLab CUE|here]]. | ||
| − | |||
| − | + | in addition, you'll probably want to set your PATH environment variable to include the $HALLD_HOME/bin/$BMS_OSNAME directory to avoid having type in the full path every time you run a program. | |
| − | + | ||
| − | + | ||
| − | + | ||
| − | + | ||
| − | |||
| − | |||
| − | |||
| + | ==COMPILING THE CODE== | ||
| + | If you have checked out a fresh and complete set of source code (e.g. a tagged release) then you should run "make" in the src directory to do a top-level build. Building the source directories in the right sequence is important in order for all dependencies to be satisfied. The makefiles are set up to build in the proper sequence when invoked from the top-level directory ''src''. After performing a top-level build one can modified source and invoke make only in the specific sub-directory without having to do a top-level make every time. | ||
| − | == | + | There are a [[build script examples|set of scripts that give examples]] of how to install the various GlueX software packages. In many cases, the scripts can be run to do the installation automatically, as long as some of the choices made for directory location are acceptable to you. |
| + | |||
| + | |||
| + | === Modifying a Program=== | ||
| + | |||
| + | Programs and plugins generally are kept in the src/programs directory tree. To modify a program one can either edit the code where it is an re-run "make" or copy the whole directory and modify the copy. | ||
| + | |||
| + | Example: | ||
| + | To make a private version of the ''hd_ana'' program called ''hd_ana_bob'' do the following: | ||
| + | |||
| + | cd $HALLD_HOME/src/programs/Analysis | ||
| + | cp -r hd_ana hd_ana_bob | ||
| + | cd hd_ana_bob | ||
| + | mv hd_ana.cc hd_ana_bob.cc | ||
| + | make clean | ||
| + | .... edit files ... | ||
| + | make | ||
| + | |||
| + | Notice that the file including ''main()'' was renamed from ''hd_ana.cc'' to ''hd_ana_bob.cc''. This is because the generic makefile system uses the basename of the ''main()''-containing file as the name of the executable. | ||
| + | |||
| + | The ''make clean'' step is needed to clear the objects and dependency files for the hd_ana.cc file which now does not exist by that name. | ||
| + | |||
| + | ===Modifying a Library=== | ||
| + | |||
| + | Code useful to more than one program should be kept in a library. Library code is stored in the src/libraries directory tree. Among other things, this is where all of the reconstruction code is kept. To modify code in a library, just go to the appropriate directory, edit the code and invoke "make". | ||
| + | |||
| + | Example: | ||
| + | To change the way the Forward Calorimeter reconstruction works, do the following: | ||
| + | |||
| + | cd $HALLD_HOME/src/libraries/FCAL | ||
| + | .... edit files .... | ||
| + | make | ||
| + | cd $HALLD_HOME/src/programs/Analysis | ||
| + | make relink | ||
| + | |||
| + | Notice that after re-making the library itself, the programs in the Analysis directory must be re-linked by hand. This brings up two important points about the functioning of the make system: | ||
| + | |||
| + | * Rebuilding a library does not automatically update the executables | ||
| + | * The make system does not detect changes in library binary files so one must ''make relink'' (not just ''make'') in any program they for which they want the program to include the revised library. | ||
| − | |||
| − | |||
| − | |||
===Modifying the Geometry=== | ===Modifying the Geometry=== | ||
| − | + | If you do not need to modify the geometry, then you can skip this item and go straight to "RUNNING HDGEANT".. | |
| − | + | ||
| − | Modify the appropriate XML file(s) and then do a "make | + | The geometry for the simulation is kept in a set of XML files in the directory: "src/programs/Simulation/hdds". |
| + | Modify the appropriate XML file(s) and then do a "make install". This will build | ||
the hdds-geant executable and run it on the main_HDDS.xml to | the hdds-geant executable and run it on the main_HDDS.xml to | ||
| − | produce hddsGeant3.F. The hddsGeant3.F file is FORTRAN source | + | produce a file named ''hddsGeant3.F''. The ''hddsGeant3.F'' file is FORTRAN source |
which contains all of the geometry definitions for the entire | which contains all of the geometry definitions for the entire | ||
| − | GlueX detector. | + | GlueX detector. By invoking "make install", ''hddsGeant3.F'', will |
| − | + | be automatically copied into ../HDGeant. (''Note: You will still need to invoke "make" yourself in the HDGeant directory.'') | |
Note that if you make changes to the geometry that you feel should be propagated | Note that if you make changes to the geometry that you feel should be propagated | ||
| − | back into the repository, you should contact | + | back into the repository, you should contact Alex Somov (somov@jlab.org) |
who is the acting gatekeeper for the geometry and simulation just to make sure he's | who is the acting gatekeeper for the geometry and simulation just to make sure he's | ||
aware of the changes and that they are implemented in a consistent way. | aware of the changes and that they are implemented in a consistent way. | ||
| − | |||
| − | |||
| − | |||
| − | |||
| − | |||
| − | |||
| − | |||
| − | |||
| − | |||
| − | |||
| − | |||
| − | |||
=RUNNING HDGEANT= | =RUNNING HDGEANT= | ||
| − | + | The simulation program comes in 2 forms ''hdgeant'' for batch usage and ''hdgeant++'' for interactive usage. | |
| − | + | These instructions focus on the batch version ''hdgeant''. | |
I'll just give a couple of hints here: | I'll just give a couple of hints here: | ||
| Line 208: | Line 232: | ||
#: src/programs/Simulation/HDGeant directory. | #: src/programs/Simulation/HDGeant directory. | ||
#: | #: | ||
| − | # Make sure | + | #: The file is in ASCII format and has lots of comments to help you configure it to suit your needs. |
| + | #: | ||
| + | # Make sure your JANA_CALIB_URL environment variable is set | ||
#: and points to the location of the calibration files. At this point, | #: and points to the location of the calibration files. At this point, | ||
#: the calibration files are text files stored in the repository | #: the calibration files are text files stored in the repository | ||
| Line 235: | Line 261: | ||
The program genr8_2_hddm (src/programs/Simulation/genr8_2_hddm) can be used to | The program genr8_2_hddm (src/programs/Simulation/genr8_2_hddm) can be used to | ||
| − | convert the output of genr8 into HDDM format. | + | convert the output of ''genr8'', ''genphoton'', and ''genpi'' into HDDM format. |
| − | The | + | After setting up your control.in file and creating any generated events file (if your not |
| + | using a built-in generator) then simply invoke ''hdgeant'' with no arguments. This will | ||
| + | produce and hddm formatted output file with a name specified in the control.in file. | ||
| + | |||
| + | The simulation produces several output files. The default name of the one with the | ||
| + | detector responses that you want is called ''hdgeant.hddm'' (unless you specified something | ||
| + | else in the control.in file". | ||
| + | |||
| + | The ''hdgeant.hddm'' file still contains some "pristine" hits. Some smearing of these is required to | ||
accurately model detector responses. In general, the calorimeter values are smeared | accurately model detector responses. In general, the calorimeter values are smeared | ||
inside of the reconstruction program while drift chamber hits are are smeared | inside of the reconstruction program while drift chamber hits are are smeared | ||
using an intermediate program called ''mcsmear''. | using an intermediate program called ''mcsmear''. | ||
| − | |||
| − | |||
=Reading in Simulated Data= | =Reading in Simulated Data= | ||
| − | + | In addition to the hddm tools (src/programs/Utilities) that can be used to scan | |
| − | + | data in an hddm file, there are several programs in the Hall-D arsenal that | |
| − | + | can read this in as well. All of them rely on the libHDDM.a library so new | |
| − | + | programs can access the data too with minimal effort. | |
| − | + | ||
| − | + | ||
| − | + | Several tools exist that can be used to look at the simulated data file, all of | |
| − | + | which have the full reconstruction software built-in. Below are descriptions | |
| − | + | of the most useful ones. | |
| − | + | ||
| − | + | ||
| − | + | ||
| − | + | ||
| − | + | ||
| − | + | ||
==hd_dump== | ==hd_dump== | ||
| − | A simple utility program is available called "hd_dump" which is based on the | + | A simple utility program is available called "hd_dump" which is based on the JANA |
| − | framework. | + | framework. |
| − | + | ||
| − | + | ||
| − | + | ||
| − | Running hd_dump with no arguments will print a usage message. Essentially through, | + | Running ''hd_dump'' with no arguments will print a usage message. Essentially through, |
you just give it the name of the hdgeant.hddm file when you run it. It will | you just give it the name of the hdgeant.hddm file when you run it. It will | ||
list the objects available event by event (pausing for user input after each event). | list the objects available event by event (pausing for user input after each event). | ||
| Line 277: | Line 298: | ||
print the contents of all objects of type ''objectname'' as well. | print the contents of all objects of type ''objectname'' as well. | ||
| − | == | + | Example of using hd_dump: |
| + | |||
| + | >hd_dump -DDMCThrown hdgeant.hddm | ||
| + | |||
| + | Registered factories: (56 total) | ||
| + | |||
| + | Name: nrows: tag: | ||
| + | ---------------- ------- -------------- | ||
| + | DBCALMCResponse 15 | ||
| + | DBCALGeometry 1 | ||
| + | DBCALShower 2 | ||
| + | DBCALTruthShower 6 | ||
| + | DBCALPhoton 2 | ||
| + | DHDDMBCALHit 11 | ||
| + | DCDCHit 10 | ||
| + | DCDCTrackHit 10 | ||
| + | DFDCHit 51 | ||
| + | DFDCPseudo 5 | ||
| + | DFDCCathodeCluster 12 | ||
| + | DFDCSegment 1 | ||
| + | DFDCIntersection 4 | ||
| + | DFDCPseudo 8 "WIRESONLY" | ||
| + | DFDCPseudo 5 "CORRECTED" | ||
| + | DFCALGeometry 1 | ||
| + | DSCTruthHit 1 | ||
| + | DSCHit 1 | ||
| + | DTOFMCResponse 2 | ||
| + | DTOFHit 2 | ||
| + | DTOFGeometry 1 | ||
| + | DHDDMTOFHit 2 | ||
| + | DTOFHit 2 "MC" | ||
| + | DTrack 1 "ALT2" | ||
| + | DTrack 1 "ALT3" | ||
| + | DTrack 1 | ||
| + | DTrackCandidate 1 | ||
| + | DTrackCandidate 1 "CDC" | ||
| + | DTrackCandidate 1 "FDC" | ||
| + | DTrackCandidate 1 "FDCCathodes" | ||
| + | DTrackCandidate 1 "FDCpseudo" | ||
| + | DTrackCandidate 1 "THROWN" | ||
| + | DMCTrackHit 24 | ||
| + | DMCThrown 1 | ||
| + | DMCTrajectoryPoint 2 | ||
| + | DTrack 1 "THROWN" | ||
| + | DTrackFitter 1 | ||
| + | DTrackFitter 1 "ALT1" | ||
| + | DTrackHitSelector 1 | ||
| + | DTrackHitSelector 1 "ALT1" | ||
| + | DPhoton 2 | ||
| + | DParticle 1 | ||
| + | DParticle 1 "THROWN" | ||
| + | |||
| + | DMCThrown: | ||
| + | q: x(cm): y(cm): z(cm): E(GeV): t(ns): p(GeV/c): theta(deg): phi(deg): type: pdgtype: myid: parentid: mech: | ||
| + | ---------------------------------------------------------------------------------------------------------------- | ||
| + | +1 0.0 0.0 65.0 1.694 -999.000 1.688 16.329 -7.040 8 0 1 0 0 | ||
| + | |||
| + | |||
| + | |||
| + | == hdview2== | ||
| + | The ''hdview2'' program is a simple event viewer written in ROOT. It can be used to help visualize the event using 2-D projections. Not all features work on it and it is geared a little toward charged particle tracking at the moment. Start it by just passing it the name of an hddm file on the command line. | ||
| + | |||
| + | Example of using hdview2: | ||
| + | |||
| + | >hdview2 hdgeant.hddm | ||
| + | |||
| + | [[Image:20090217_hdview2.gif|700px]] | ||
| + | |||
| + | |||
| + | == hd_root == | ||
| + | The ''hd_root'' program can be used to make histograms and trees in a ROOT file. The program itself only creates an empty ROOT file and then cycles through events. The usefulness comes in through plugins that make and fill the histos and trees. The idea is that one can specify any number of plugins on the command line and the histograms and trees created by all of them will go into a single ROOT file. It is important to note that reconstruction algorithms are all compiled into hd_root, but it is left to the plugins to actually activate them. | ||
| + | |||
| + | Example: Using hd_root to make ROOT file with TTree containing information on CDC hits. | ||
| + | |||
| + | hd_root --plugin=cdc_hists --auto_activate=DCDCTrackHit hdgeant.hddm | ||
| + | |||
| + | |||
| + | == janaroot plugin == | ||
| + | |||
| + | In the most general case, one can use the ''janaroot'' plugin to create a separate ROOT file with trees filled with the objects of interest. Since this plugin creates its own ROOT file, it can be used with any of the Hall-D reconstruction programs including ''hd_root'' and ''hd_ana''. | ||
| + | |||
| + | Example: Using the janaroot plugin to create TTrees with generated particles and reconstructed photons | ||
| + | |||
| + | hd_ana --plugin=janaroot --auto_activate=DMCThrown --auto_activate=DPhoton hdgeant.hddm | ||
| + | |||
| + | |||
| + | ==Making your own custom program== | ||
| + | |||
| + | If you are not familiar or comfortable with using plugins then you may just want to | ||
| + | create your own custom program. It is probably easiest to just copy the source for | ||
| + | ''hd_root'' and modify it to create and fill the histograms/trees that you want. | ||
The main idea behind JANA is that it passes around C++ objects that contain the | The main idea behind JANA is that it passes around C++ objects that contain the | ||
| Line 284: | Line 395: | ||
[http://www.jlab.org/Hall-D/software/HDSoftware_Documentation/ doxygen generated on-line documentation]. | [http://www.jlab.org/Hall-D/software/HDSoftware_Documentation/ doxygen generated on-line documentation]. | ||
| − | |||
| − | |||
| − | |||
| − | |||
| − | |||
| − | |||
===Using plugins=== | ===Using plugins=== | ||
| Line 307: | Line 412: | ||
Although a plugin can be attached to any DANA program, a generic program | Although a plugin can be attached to any DANA program, a generic program | ||
| − | ''hd_root'' exists that serves as a shell specifically written for this task. For example, to | + | ''hd_root'' exists that serves as a shell specifically written for this task (see above). For example, to |
create a root file with the thrown values histograms and the histograms used to | create a root file with the thrown values histograms and the histograms used to | ||
study the acceptance of the GlueX detector, type this: | study the acceptance of the GlueX detector, type this: | ||
| Line 313: | Line 418: | ||
>hd_root --plugin=mcthrown_hists --plugin=acceptance_hists hdgeant.hddm | >hd_root --plugin=mcthrown_hists --plugin=acceptance_hists hdgeant.hddm | ||
| − | This will create a ROOT file called '' | + | This will create a ROOT file called ''hd_root.root''. Inside the file would be two |
directories called "THROWN" and "ACCEPTANCE" containing the histograms produced | directories called "THROWN" and "ACCEPTANCE" containing the histograms produced | ||
by the respective plugins. | by the respective plugins. | ||
You can create your own plugin using one of the existing plugins as a template. | You can create your own plugin using one of the existing plugins as a template. | ||
| − | |||
| − | |||
| − | |||
| − | |||
| − | |||
| − | |||
| − | |||
| − | |||
| − | |||
| − | |||
| − | |||
| − | |||
| − | |||
| − | |||
Revision as of 17:59, 17 February 2009
This is derived from the original web document "Getting started with HDGeant"
D. Lawrence 11/11/04
D. Lawrence 4/6/06 Updated
D. Lawrence 12/5/06 Converted to Wiki
D. Lawrence 1/18/07 Finished Converting to Wiki
D. Lawrence 2/4/08 Tweaked for calibDB among others
D. Lawrence 2/17/09 Overhauled to reflect current state of code
Contents
Overview
This document gives the bare minimum to get you up and going with running the GlueX GEANT-based simulation program hdgeant and looking at the output. More details are given in other HOWTOs (to be written).
The basic steps to running and analyzing a GlueX simulation are:
- Getting and compiling the source code
- Configuring and running the hdgeant program
- Running one of the Hall-D DANA-based reconstruction programs (This could involve customizing the C++ program for your needs or using one of the pre-built plugins to create ROOT TTrees)
Getting and compiling the source code
Required 3rd Party Packages
The source relies on several software packages that are not kept in the Hall-D repository. These must be downloaded and installed prior to compiling the Hall-D source. Here is a list of what you will need.
JANA
Make sure you set your JANA_HOME environment variable to point to the directory containing the bin, lib, and include directories after building JANA.
CERNLIB
Make sure you set your CERN and CERN_LEVEL environment variables and that the cernlib script is in your path as it will be used by the makefiles.
Check here for possible issues with CERNLIB installation.
ROOT
Make sure your ROOTSYS environment variable is set and that the root-config script is in your path. Also, make sure the ROOT shared libraries directory (usually $ROOTSYS/lib) is in your LD_LIBRARY_PATH (DYLD_LIBRARY_PATH on OS X) environment variable.
XERCES
(note that binaries exist on the JLab CUE for certain platforms:)
Note: You only need the XERCES Perl module if you're going to be modifying the data model.
XERCES Perl module
Note: You only need the XALAN package if you're going to be modifying the data model AND you want to convert between hddm template and schema files. You can install either the java version or the C version. See the source for the hddm-schema and schema-hddm perl scripts for how to select which to use.
XALAN-Java (xalan.jar)
XALAN-C
Getting the Hall-D Source
The Hall-D specific source code is kept in a Subversion repository on the JLab CUE. The repository can be accessed via anonymous svn checkout (even from offsite) but you must have a CUE account and you must belong to the "halld" unix group in order to commit changes back into it. (Contact the JLab computer center for help on getting a CUE account.)
First, you will need to create a directory where your files will be kept. (I use a directory called HallD in my home directory.) Set your HALLD_HOME environment variable to point to this directory.
Next, you can check out the code:
CHECKING OUT THE CODE
1. Check that subversion is installed on your system. Many Linux distributions now install subversion with the development tools so it may already be there (check for an executable named "svn").
2. Check out the source:
You will probably want to get the most recent stable release. These are tagged in the repository in the top level "tags" directory. To get a list of available tagged releases, issue the following subversion command:
svn ls https://halldsvn.jlab.org/repos/tags
You should see a list of directories with names like: release-YYYY-MM-DD
where YYYY-MM-DD are the year, month and day the release was made.
For example, if you wanted to check out the release-2009-01-06 release you would enter the following:
svn co https://halldsvn.jlab.org/repos/tags/release-2009-01-06
svn co https://halldsvn.jlab.org/repos/trunk/calib
where the second line obtains a copy of the calibration constants from the repository where they are being kept temporarily until an actual database is developed.
Note that if you check out a tagged release, you should not commit any changes to that source back into the repository (in subversion, you can commit changes to tagged code just as easily as to the main trunk.)
If you want to develop code to contribute back into the repository for others to use, you should checkout from the trunk of the tree:
svn co https://halldsvn.jlab.org/repos/trunk/src
Setting up your Environment
Several environment variables are needed to compile and run the Hall-D software. The following is a list of environment variables related to 3rd party packages:
- JANA_HOME
- XERCESCROOT
- CERN
- CERN_LEVEL
- ROOTSYS
Environment variables needed that identify locations of Hall-D files
- JANA_CALIB_URL
- JANA_GEOMETRY_URL
- HALLD_HOME
- HALLD_MY (optional)
Example:
 Suppose you checked out the code into a directory called /home/bob/GlueX. Then you would these environment variables to the following:


setenv HALLD_HOME /home/Bob/GlueX
setenv JANA_CALIB_URL file:///home/Bob/GlueX/calib
setenv JANA_GEOMETRY_URL xmlfile://${HALLD_HOME}/src/programs/Simulation/hdds/main_HDDS.xml
If you wish to edit programs and then link against libraries in a common area you can do so through use of the HALLD_MY environment variable whose use is explained here.
in addition, you'll probably want to set your PATH environment variable to include the $HALLD_HOME/bin/$BMS_OSNAME directory to avoid having type in the full path every time you run a program.
COMPILING THE CODE
If you have checked out a fresh and complete set of source code (e.g. a tagged release) then you should run "make" in the src directory to do a top-level build. Building the source directories in the right sequence is important in order for all dependencies to be satisfied. The makefiles are set up to build in the proper sequence when invoked from the top-level directory src. After performing a top-level build one can modified source and invoke make only in the specific sub-directory without having to do a top-level make every time.
There are a set of scripts that give examples of how to install the various GlueX software packages. In many cases, the scripts can be run to do the installation automatically, as long as some of the choices made for directory location are acceptable to you.
Modifying a Program
Programs and plugins generally are kept in the src/programs directory tree. To modify a program one can either edit the code where it is an re-run "make" or copy the whole directory and modify the copy.
Example:
  To make a private version of the hd_ana program called hd_ana_bob do the following:

cd $HALLD_HOME/src/programs/Analysis
cp -r hd_ana hd_ana_bob
cd hd_ana_bob
mv hd_ana.cc hd_ana_bob.cc
make clean
.... edit files ...
make
Notice that the file including main() was renamed from hd_ana.cc to hd_ana_bob.cc. This is because the generic makefile system uses the basename of the main()-containing file as the name of the executable.
The make clean step is needed to clear the objects and dependency files for the hd_ana.cc file which now does not exist by that name.
Modifying a Library
Code useful to more than one program should be kept in a library. Library code is stored in the src/libraries directory tree. Among other things, this is where all of the reconstruction code is kept. To modify code in a library, just go to the appropriate directory, edit the code and invoke "make".
Example:
  To change the way the Forward Calorimeter reconstruction works, do the following:

cd $HALLD_HOME/src/libraries/FCAL
.... edit files ....
make
cd $HALLD_HOME/src/programs/Analysis
make relink
Notice that after re-making the library itself, the programs in the Analysis directory must be re-linked by hand. This brings up two important points about the functioning of the make system:
- Rebuilding a library does not automatically update the executables
- The make system does not detect changes in library binary files so one must make relink (not just make) in any program they for which they want the program to include the revised library.
Modifying the Geometry
If you do not need to modify the geometry, then you can skip this item and go straight to "RUNNING HDGEANT"..
The geometry for the simulation is kept in a set of XML files in the directory: "src/programs/Simulation/hdds". Modify the appropriate XML file(s) and then do a "make install". This will build the hdds-geant executable and run it on the main_HDDS.xml to produce a file named hddsGeant3.F. The hddsGeant3.F file is FORTRAN source which contains all of the geometry definitions for the entire GlueX detector. By invoking "make install", hddsGeant3.F, will be automatically copied into ../HDGeant. (Note: You will still need to invoke "make" yourself in the HDGeant directory.)
Note that if you make changes to the geometry that you feel should be propagated back into the repository, you should contact Alex Somov (somov@jlab.org) who is the acting gatekeeper for the geometry and simulation just to make sure he's aware of the changes and that they are implemented in a consistent way.
RUNNING HDGEANT
The simulation program comes in 2 forms hdgeant for batch usage and hdgeant++ for interactive usage. These instructions focus on the batch version hdgeant.
I'll just give a couple of hints here:
- When running hdgeant, make sure the control.in
- file exists in the current working directory. This can be found in the
- src/programs/Simulation/HDGeant directory.
- The file is in ASCII format and has lots of comments to help you configure it to suit your needs.
- Make sure your JANA_CALIB_URL environment variable is set
- and points to the location of the calibration files. At this point,
- the calibration files are text files stored in the repository
- and can be checked out via:
- svn co https://halldsvn.jlab.org/repos/trunk/calib
- Example:
- The root of your calibration files tree is /home/jdoe/HallD/calib
- setenv JANA_CALIB_URL file:///home/jdoe/HallD/calib
The control.in file should be edited to suit your specific simulation. Most importantly, you need to define the source of events. There are 3 main options which are documented in the example control.in file. They are:
- coherent bremstrahlung photon generator(built-in)
- single particle gun(built-in)
- read events from an external file in HDDM (Hall-D Data Model) format.
An HDDM file can be generated using any of the following programs:
- genr8 (src/programs/Simulation/genr8) generator for specific reaction via isobar model
- bggen (src/programs/Simulation/bggen) generator for full hadronic photoproduction spectrum
- genphoton (src/programs/Simulation/genphoton) external particle gun for single photons
- genpi (src/programs/Simulation/genpi) external particle gun for single pions
The program genr8_2_hddm (src/programs/Simulation/genr8_2_hddm) can be used to convert the output of genr8, genphoton, and genpi into HDDM format.
After setting up your control.in file and creating any generated events file (if your not using a built-in generator) then simply invoke hdgeant with no arguments. This will produce and hddm formatted output file with a name specified in the control.in file.
The simulation produces several output files. The default name of the one with the detector responses that you want is called hdgeant.hddm (unless you specified something else in the control.in file".
The hdgeant.hddm file still contains some "pristine" hits. Some smearing of these is required to accurately model detector responses. In general, the calorimeter values are smeared inside of the reconstruction program while drift chamber hits are are smeared using an intermediate program called mcsmear.
Reading in Simulated Data
In addition to the hddm tools (src/programs/Utilities) that can be used to scan data in an hddm file, there are several programs in the Hall-D arsenal that can read this in as well. All of them rely on the libHDDM.a library so new programs can access the data too with minimal effort.
Several tools exist that can be used to look at the simulated data file, all of which have the full reconstruction software built-in. Below are descriptions of the most useful ones.
hd_dump
A simple utility program is available called "hd_dump" which is based on the JANA framework.
Running hd_dump with no arguments will print a usage message. Essentially through, you just give it the name of the hdgeant.hddm file when you run it. It will list the objects available event by event (pausing for user input after each event). If you give it any "'-Dobjectname" options on the command line, it will attempt to print the contents of all objects of type objectname as well.
Example of using hd_dump:

>hd_dump -DDMCThrown hdgeant.hddm

Registered factories: (56 total)

Name:             nrows:  tag:
---------------- ------- --------------
DBCALMCResponse     15
DBCALGeometry        1
DBCALShower          2
DBCALTruthShower     6
DBCALPhoton          2
DHDDMBCALHit        11
DCDCHit             10
DCDCTrackHit        10
DFDCHit             51
DFDCPseudo           5
DFDCCathodeCluster  12
DFDCSegment          1
DFDCIntersection     4
DFDCPseudo           8    "WIRESONLY"
DFDCPseudo           5    "CORRECTED"
DFCALGeometry        1
DSCTruthHit          1
DSCHit               1
DTOFMCResponse       2
DTOFHit              2
DTOFGeometry         1
DHDDMTOFHit          2
DTOFHit              2    "MC"
DTrack               1    "ALT2"
DTrack               1    "ALT3"
DTrack               1
DTrackCandidate      1
DTrackCandidate      1    "CDC"
DTrackCandidate      1    "FDC"
DTrackCandidate      1    "FDCCathodes"
DTrackCandidate      1    "FDCpseudo"
DTrackCandidate      1    "THROWN"
DMCTrackHit         24
DMCThrown            1
DMCTrajectoryPoint   2
DTrack               1    "THROWN"
DTrackFitter         1
DTrackFitter         1    "ALT1"
DTrackHitSelector    1
DTrackHitSelector    1    "ALT1"
DPhoton              2
DParticle            1
DParticle            1    "THROWN"

DMCThrown:
  q: x(cm): y(cm): z(cm): E(GeV):    t(ns): p(GeV/c): theta(deg): phi(deg): type: pdgtype: myid: parentid: mech:
----------------------------------------------------------------------------------------------------------------
 +1    0.0    0.0   65.0   1.694  -999.000     1.688      16.329    -7.040     8        0     1         0     0
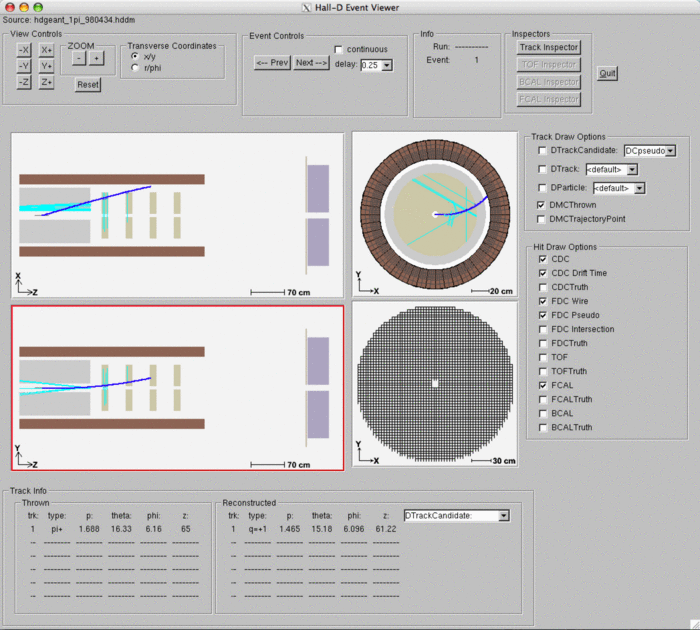
hdview2
The hdview2 program is a simple event viewer written in ROOT. It can be used to help visualize the event using 2-D projections. Not all features work on it and it is geared a little toward charged particle tracking at the moment. Start it by just passing it the name of an hddm file on the command line.
Example of using hdview2:
>hdview2 hdgeant.hddm

hd_root
The hd_root program can be used to make histograms and trees in a ROOT file. The program itself only creates an empty ROOT file and then cycles through events. The usefulness comes in through plugins that make and fill the histos and trees. The idea is that one can specify any number of plugins on the command line and the histograms and trees created by all of them will go into a single ROOT file. It is important to note that reconstruction algorithms are all compiled into hd_root, but it is left to the plugins to actually activate them.
Example: Using hd_root to make ROOT file with TTree containing information on CDC hits.

hd_root --plugin=cdc_hists --auto_activate=DCDCTrackHit hdgeant.hddm
janaroot plugin
In the most general case, one can use the janaroot plugin to create a separate ROOT file with trees filled with the objects of interest. Since this plugin creates its own ROOT file, it can be used with any of the Hall-D reconstruction programs including hd_root and hd_ana.
Example: Using the janaroot plugin to create TTrees with generated particles and reconstructed photons

hd_ana --plugin=janaroot --auto_activate=DMCThrown --auto_activate=DPhoton hdgeant.hddm
Making your own custom program
If you are not familiar or comfortable with using plugins then you may just want to create your own custom program. It is probably easiest to just copy the source for hd_root and modify it to create and fill the histograms/trees that you want.
The main idea behind JANA is that it passes around C++ objects that contain the data of interest. In order to access the data you want, you must first figure out what object(s) contain it. You can browse or search for the objects you need in the doxygen generated on-line documentation.
Using plugins
All DANA executables can have plugins attached at run time to extend the functionality of the program. For those who are unfamiliar with the term, a plugin is just a dynamically linked object that contains routines that can be accessed by a running executable.
Several plugins have been written that can add histograms/trees to a ROOT file. For example, the "mcthrown_hists plugin will create histograms and fill them with the "thrown" values from Monte Carlo data. There is also a cdc_hists plugin that will produce histograms related specifically to the CDC. In general, these plugins will create a separate directory in the ROOT file to place their histograms/trees. This allows mulitple plugins to be attached to the same executable without risk of conflict between histogram names. Source code for the plugins resides in the src/programs/Analysis/plugins directory.
Although a plugin can be attached to any DANA program, a generic program hd_root exists that serves as a shell specifically written for this task (see above). For example, to create a root file with the thrown values histograms and the histograms used to study the acceptance of the GlueX detector, type this:
>hd_root --plugin=mcthrown_hists --plugin=acceptance_hists hdgeant.hddm
This will create a ROOT file called hd_root.root. Inside the file would be two directories called "THROWN" and "ACCEPTANCE" containing the histograms produced by the respective plugins.
You can create your own plugin using one of the existing plugins as a template.